Enable Session Notes
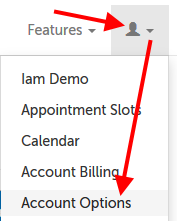
1. While logged in as an Account Administrator, click on the profile tab (head/shoulders icon) and select "Account Options" from the drop-down menu.
![Session Notes in the Features menu](../../Resource/Permanent/Screencap/00/0000/000000/00000001/Screencap-197-017_F831C4C4B6FE70EF5863E84116EE1FA60319D06C5E31AF299AFC31B35EF1B111.png)
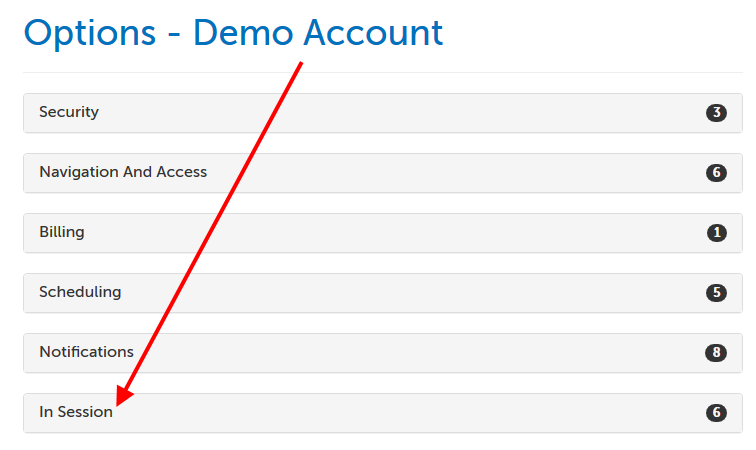
2. Click on the "In Session" section to expand it.
![Options for "In Session" features](../../Resource/Permanent/Screencap/00/0000/000000/00000001/Screencap-197-018_321AD6A78CCF622C46998E7FDDCDEBFA49F23413AD4805F9ACFE38AA59A22B95.png)
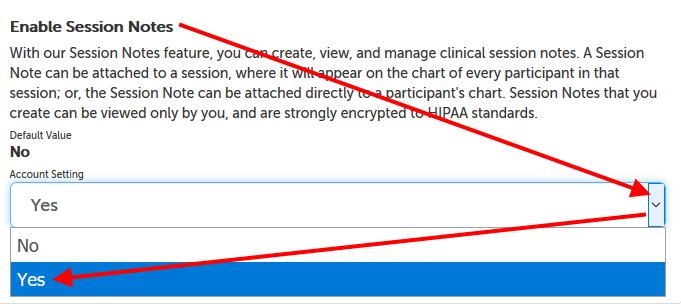
3. Scroll down to the "Enable Session Notes" option and change the setting from "No" to "Yes". The change will be saved automatically.
Create a Session Note: about a session and participants
1. Once you have scheduled a session, a "Session Notes" will appear on the new session panel. Click on it.
![Session Notes button](../../Resource/Permanent/Screencap/00/0000/000000/00000001/Screencap-197-004_D9B7BB4FB60310C8948713FF2486680C3FB95CFE6BE95D0CA4B1C0A873D8D185.png)
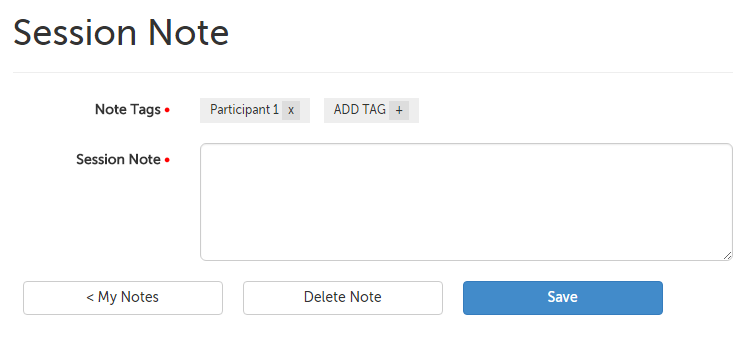
2. You will be taken to a separate page where you can start typing your note.
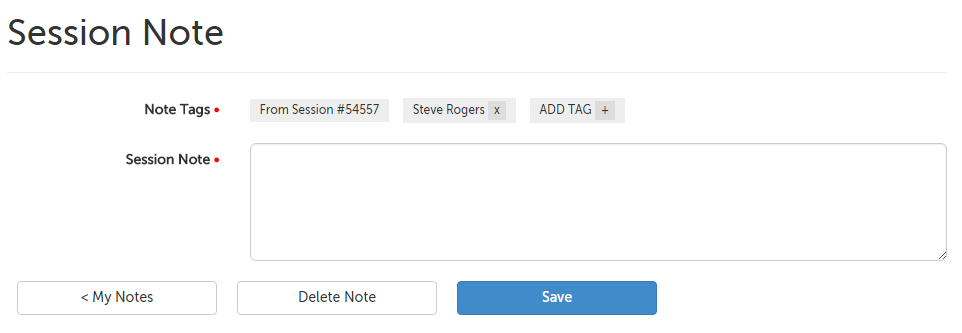
![Notes page](../../Resource/Permanent/Screencap/00/0000/000000/00000001/Screencap-197-006_C995EA5F758F5D7CE59C5B542D5AABEF618057125069D70429563176C5EE838F.png)
3. If you'd like to add other contacts to this note, click on "Add Tag +" to select other contacts in your contacts list.
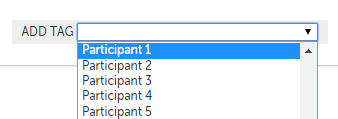
4. Click "Save" in the lower right hand corner.
Create a Session Note: about a contact
1. Click on the "Features" tab and select "Session Notes" from the drop-down menu.
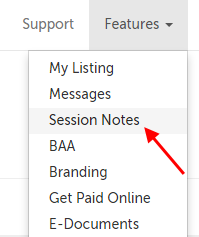
![Session Notes in the Features menu](../../Resource/Permanent/Screencap/00/0000/000000/00000001/Screencap-197-016_5387C2943BDB60DE978A73B2DA63A7B8B1E4989B376FCF92336210D5C11CC862.png)
2. Click the "New Note" button.
![New Note](../../Resource/Permanent/Screencap/00/0000/000000/00000001/Screencap-197-009_7AA0857416EC795A2204ED3A4E6C6449B34AEDF8A214E94270E77E12FE316AA8.png)
3. From the drop-down menu that appears, choose the contact the note is about and then click "Select" in the lower right hand corner.
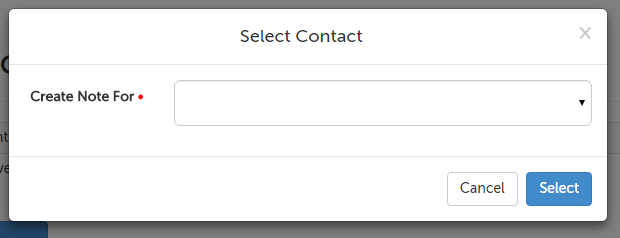
![Create note for contact](../../Resource/Permanent/Screencap/00/0000/000000/00000001/Screencap-197-010_5F4B44E0A74D054DBA33E7F65600A8D6D4E890C932C3A6092382FA2F75107A6C.png)
4. Start typing your note.
![New note about a contact](../../Resource/Permanent/Screencap/00/0000/000000/00000001/Screencap-197-011_1A9951D792E63E9994B5BBB8E4EEFD64288B5B30DB73006C6455DA6AC681FAF0.png)
5. If you'd like to add other contacts to this note, click on "Add Tag +" to select other contacts in your contacts list.
6. When you're done, click "Save" in the lower right hand corner.
Edit a Session Note
1. Click on the "Features" tab and select "Session Notes" from the drop-down menu.
![Session Notes in the Features menu](../../Resource/Permanent/Screencap/00/0000/000000/00000001/Screencap-197-016_5387C2943BDB60DE978A73B2DA63A7B8B1E4989B376FCF92336210D5C11CC862.png)
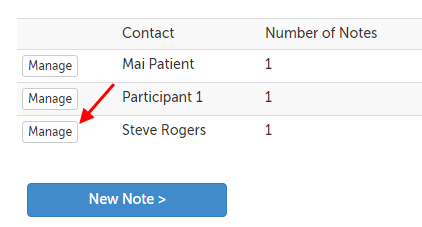
2. Notes are sorted by the contacts they are associated with. Click on "Manage" next to the contact that would have the note that you would like to edit.
![Manage buttons](../../Resource/Permanent/Screencap/00/0000/000000/00000001/Screencap-197-012_56B7EE2A51ABEF4313FFA669A0EB4038328AE241B4BF13F6B6E5ED1C4A80155F.png)
3. Click on the "Edit" button on the right hand side of the note.
![Edit button](../../Resource/Permanent/Screencap/00/0000/000000/00000001/Screencap-197-013_F47FA3F321F28532CFAC2A5C7AD765A854D868BB5A6482870C4F2B1AF0696946.png)
4. Edit your note as desired, and then click the "Save" button.
Delete a Session Note
1. Click on the "Features" tab and select "Session Notes" from the drop-down menu.
![Session Notes in the Features menu](../../Resource/Permanent/Screencap/00/0000/000000/00000001/Screencap-197-016_5387C2943BDB60DE978A73B2DA63A7B8B1E4989B376FCF92336210D5C11CC862.png)
2. Notes are sorted by the contacts they are associated with. Click on "Manage" next to the contact that would have the note that you would like to edit.
![Manage buttons](../../Resource/Permanent/Screencap/00/0000/000000/00000001/Screencap-197-012_56B7EE2A51ABEF4313FFA669A0EB4038328AE241B4BF13F6B6E5ED1C4A80155F.png)
3. Click on the "Edit" button on the right hand side of the note.
![Edit button](../../Resource/Permanent/Screencap/00/0000/000000/00000001/Screencap-197-013_F47FA3F321F28532CFAC2A5C7AD765A854D868BB5A6482870C4F2B1AF0696946.png)
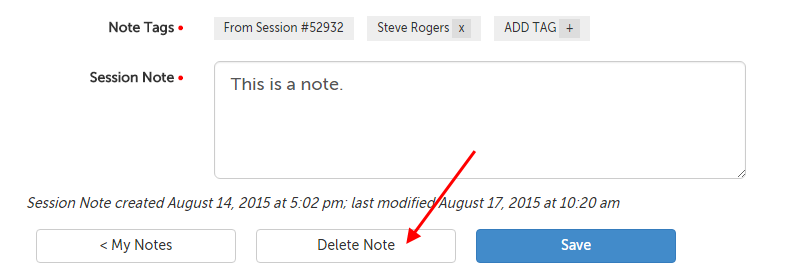
4. Click the "Delete Note" button along the bottom.
![Delete Note button](../../Resource/Permanent/Screencap/00/0000/000000/00000001/Screencap-197-014_107086C6F37A2AC1A4910819588C4A485700932272D338CD2EE2D2A0CD160D59.png)
5. Confirm that you would like to permanently delete this note by clicking the "Delete Note" button on the message that appears.
![Permanently delete note confirmation](../../Resource/Permanent/Screencap/00/0000/000000/00000001/Screencap-197-015_BF53259CDC3896920650755781C6B7B82783828C1C6643EE3F738B95D126A40A.png)
This article was last reviewed by our Support team on August 15, 2015.